How to Make Charcuterie Cones

This guide to how to make DIY charcuterie cones will walk you through making a delicious appetizer perfect for parties. With these step-by-step instructions, making these individual servings of charcuterie will be a breeze.

For more ideas, check out my favorite condiments for a charcuterie board or cheese board. Wondering how to choose the best cheeses and how to pair them? You’ll want to take a look at how to choose and cut cheese for a charcuterie board.
My breakfast charcuterie board would be fun in the morning or early afternoon.
And for an amazing and easy appetizer that will disappear in no time, you must try this spinach dip!
I was invited to a St. Patrick’s Day party recently and decided to make this amazing hand-held appetizer. Everyone loved it and several people asked me for the recipe.
The hostess even sent me this photo from the party!
Why We Love DIY Charcuterie Cones
The first time I saw individual charcuterie cones was at the Epcot International Food and Wine Festival way back in 2017.
This beautiful cone was the talk of the Festival. Why did it take me so long to recreate it? I was wondering that myself!

As you can see, their version is super simple to make, but I wanted to do something different.
What Goes Into This Recipe
Of course, this recipe is totally versatile, so you can add the things you like the most. These are some of my favorite things for a charcuterie board, so I just incorporated them into a cone to make individual appetizers.

- Tomatoes
- Basil
- Mozzarella pearls
- Sharp cheddar cheeses
- Castelvetrano olives
- Prosciutto
- Dried Apricots
- Breadsticks
- Fresh rosemary
- Grapes
🔪 Recommended Tools
Of course, you will need charcuterie cones. You could try to put together your own cones using parchment paper and a piece of tape, but these cones were $14. for 100, so I will get a lot of use out of them!
I also bought cone stands, which are a great way to display your work of art! These come two to a package so it displays 24.
The tray can be used for ice cream cones, too. We were thrilled with how they looked in this tray!
You could also use Charcuterie Cups which come with cocktail picks. These are super cute and the benefit is that the bottom of the cup is flat so they stand up. It’s nice to be able to pick up your wine glass!
Once you grab a charcuterie cone, the only way to put it down is on its side and then the contents spill out. Still, they are so cute!
This complete set of cones and display rack is at a great price now, too. I really like the racks I bought, but these are cute, too.
Bamboo cones are pretty, too, but they cost a little more.
How to Make Charcuterie Cones
Step 1: Wash the produce and set aside to dry on a paper towel.
Step 2: Take one tomato, one basil leaf, and one small ball of mozzarella and thread them onto a toothpick. Set aside in a bowl.

Step 3: Slice a piece of prosciutto into pieces (long side) and fold them back and forth, ribbon-like.
Step 4: Thread two pieces of ribboned prosciutto with one dried apricot onto the cocktail pick. Set aside in a bowl.

Step 5: Take one Castelvetrano olive and one cube of sharp cheddar cheese and thread on another toothpick. Set aside in a bowl.

Unwrap your breadsticks and set them aside.
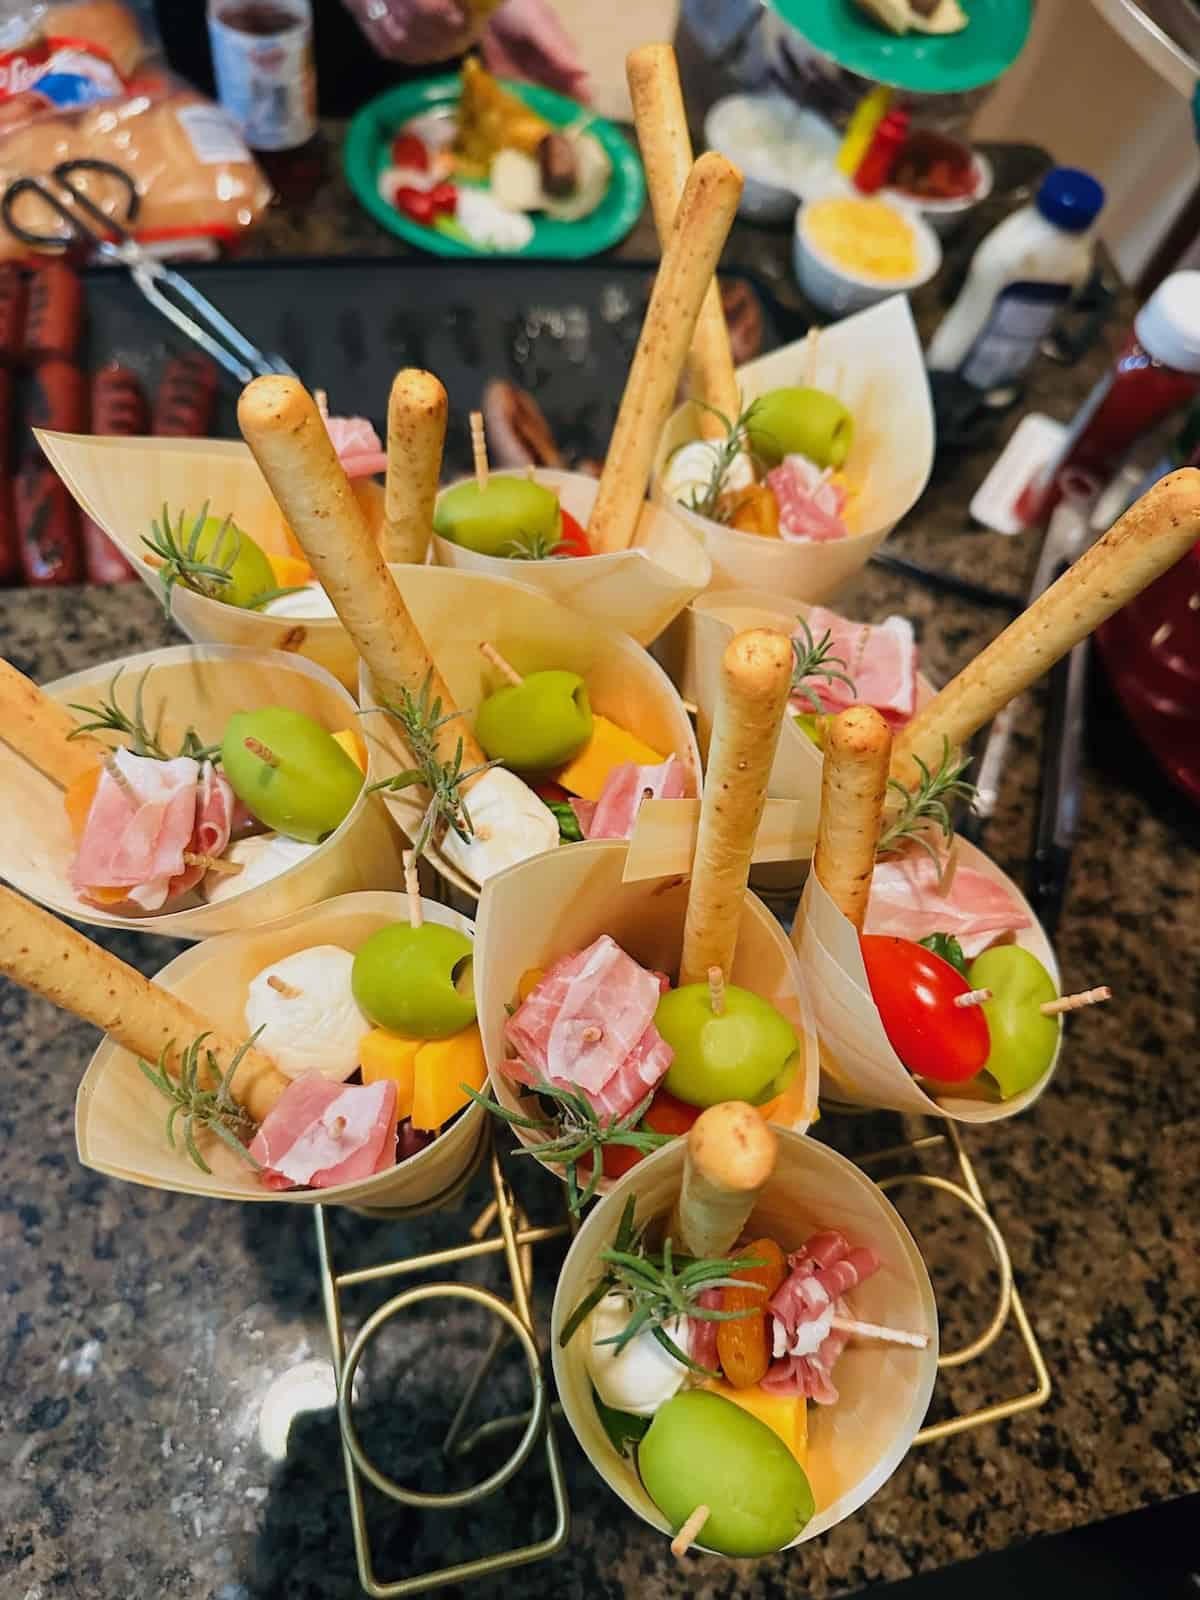
Step 6: Set cones in the cone stand.
Step 7: Into each cone, place three grapes into the bottom of the cone. This is the perfect way to make the other items set higher in the cone and be a nice treat at the end. These nuts for a charcuterie board are nice at the bottom, too.

Step: 8 Place the items that are on toothpicks in the cone with the flat part of the toothpick facing up. The order doesn’t matter.

Step 9: Add a breadstick to each cone and garnish with a sprig of rosemary or your choice of fresh herbs.
Aren’t they pretty? They were the talk of the party!

Variations
These adorable hand-held cones are perfect for holiday parties, baby showers, cocktail parties, and even picnics.
So much more fun than traditional charcuterie boards, you can create many different variations for these cones.
For kids, you could make cute charcuterie cones filled with fresh fruit or fresh veggies. This is a fun way to get them to eat healthy foods.
For a patriotic holiday party, you could fill your cones with strawberries, blueberries, and a white cheddar cheese star.
For Christmas, make the cones with green and red foods and garnish them with cheese cut into snowflakes or holiday season decorations. A wrapped candy cane would be perfect!
For Valentine’s Day, make pieces of cheese and fruit into hearts with a small cookie cutter.
You could even fill the cones with foods from a particular country, like German foods for Oktoberfest or Irish foods for St. Patrick’s Day.
These bacon straws would be great! Just make sure they are completely dry and next to something complementary.
Choose your favorite ingredients and get creative making a beautiful treat for your guests.

Frequently Asked Questions
You could, but I would be concerned about any moisture transferring onto the cone as well as them getting crushed. The cones I bought were nice and sturdy and about the same price as paper cones.
You could cut up your cheeses and meat, wash your produce, and get anything else that will go into the cone ready. I think it’s best to assemble the cones as soon before serving as possible. If you’re making a lot, you could wrap tightly in plastic wrap and store in the refrigerator. Add bread or crackers just before serving.
Of course! Just make sure it is dry and won’t melt if it gets warm if you’re serving outside. A piece of chocolate would be a nice finish, but not if you’re serving outside in warm weather. A strawberry would work well, too, as long as you can find relatively small berries.
Top Tips for DIY Charcuterie Cones
Use your favorite meats like salami, Iberico ham, or mortadella.
Any kind of cheese would work, including soft cheeses like brie cut into small slices.
Try adding a small piece of honeycomb for a delicious treat as well as a pretty presentation!
It’s best to prepare a cone in advance to make sure it works. Sometimes things sound great in our heads and then just don’t work as we thought! (Or is that just me?!)
Don’t overfill the cones. Remember there will be other appetizers, so this should be just enough food to get a taste of everything.
You’ll find printable instructions below. Love this recipe? We’d so appreciate you giving it a 5-star rating!

More Charcuterie Ideas
Best Nuts for a Charcuterie Board

How to Make Charcuterie Cones
Equipment
- Charcuterie Cones
- Cone display rack
Ingredients
- ¾ pound Cherry tomatoes
- 1 bunch Basil
- 24 Bocconcini Mozzarella pearls
- 24 Castelvetrano olives
- 6 ounces Prosciutto
- 24 Dried Apricots
- 24 Breadsticks
- 24 Fresh rosemary sprigs
- 72 Grapes
- ½ pound Sharp cheddar cheese
Instructions
- Wash the produce and set aside to dry on a paper towel.
- Take one tomato, one basil leaf, and one small ball of mozzarella and thread them onto a toothpick. Set aside in a bowl.
- Slice a piece of prosciutto into pieces (long side) and fold them back and forth, ribbon-like.
- Thread two pieces of ribboned prosciutto with one dried apricot onto the cocktail pick. Set aside in a bowl.
- Take one Castelvatrano olive and one cube of sharp cheddar cheese and thread on another toothpick. Set aside in a bowl.
- Unwrap your breadsticks and set them aside.
- Set cones in the cone stand.
- Into each cone, place three grapes into the bottom of the cone. This is the perfect way to make the other items set higher in the cone and be a nice treat at the end.
- Next, place the items that are on toothpicks in the cone with the flat part of the toothpick facing up. The order doesn’t matter.
- Add a breadstick to each cone and garnish with a sprig of rosemary or your choice of fresh herbs.
Notes
Any kind of cheese would work, including soft cheeses like brie cut into small slices.
Try adding a small piece of honeycomb for a delicious treat as well as a pretty presentation!
It’s best to prepare a cone in advance to make sure it works. Sometimes things sound great in our heads and then just don’t work as we thought! (Or is that just me?!)
Don’t overfill the cones. Remember there will be other appetizers, so this should be just enough food to get a taste of everything.
Nutrition