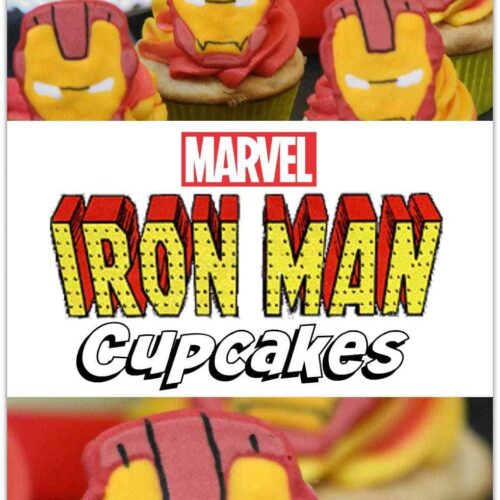
Iron Man Cupcakes
I don't care which side you're on, everyone will love these Iron Man Cupcakes!
Ingredients
White Cupcakes Ingredients
- 1/2 C unsalted butter room temperature
- 2 egg whites
- 2 eggs room temperature
- 2 C flour
- 1 t baking powder
- 1/2 t salt
- 1/4 t baking soda
- 3/4 C buttermilk
- 1 1/2 C sugar
- 1 t vanilla
- 1/2 t almond extract
Frosting Ingredients
- 1 C unsalted butter softened
- 4 C powdered sugar plus a little extra
- 4 T heavy whipping cream
- red gel food coloring
- golden yellow gel food coloring
Royal Icing Ingredients
- 2 egg whites
- 1 C powdered sugar
- 1/2 t cream of tartar
- red gel food coloring
- golden yellow gel food coloring
- Wilton food pen, black
Instructions
To Make the Cupcakes
- Preheat oven to 350 degrees.
- Line cupcake tins with paper liners.
- Sift flour, baking powder, salt, and baking soda.
- On medium high, beat the butter for 30 seconds.
- Add the sugar, vanilla, and almond extract to the butter and mix to combine.
- Beat after each addition of the egg whites and eggs, one at a time.-
- Add the flour mixture and buttermilk alternating each one to the butter mixture on low.
- Scoop the batter till 3/4 filled in the lined cupcake tins.
- Bake at 350 degrees for 20-25 minutes.
- Allow the cupcakes to cool for 10 minutes before removing from the cupcake tin.
- Place on a wire rack to cool completely.
To Make the Frosting
- Cream the butter and powdered sugar until it looks light and creamy. If it doesn't cream add several drops of the heavy whipping cream until it does.
- Test to see if the frosting can form and hold a stiff peak by taking a spoonful of frosting and turning the spoon upside down. If the frosting stays on the spoon it is ready. If not, add more powdered sugar 1/2 C at a time, mixing well.
- Divide the frosting equally into two bowls. In the first bowl add several drops of red gel food coloring and mix well.
- In the second bowl, add several drops of golden yellow gel food coloring. Stir to blend the color.
- When ready, scoop the red frosting first into a pastry bag, adding the golden yellow frosting into the same bag with a large tip. You will want them side by side in the bag.
- Twist the open end of the pastry bag to push the frosting to the tip, testing to make sure that both colors come to the tip at the same time.
- Start the frosting on the outside edge of the cupcake working to the center of the cupcake.
To Make the Icing
- Combine all ingredients except for food coloring in a mixing bowl mixing on medium speed for 4 minutes.
- If icing is not stiff enough add 1/4 C powdered sugar.
- Spoon the icing into a bowl.
- Take out 2 tablespoons of icing and leave it white.
- Divide the rest of the icing into two bowls.
- To the first bowl, add red gel food coloring, stirring to mix.
- To the second bowl, add golden yellow gel food coloring, stirring to mix.
Making the helmet
- Locate a picture of Iron Man's Mask. Print the mask in color with several small images of it. Place it on a cookie sheet.
- Tape wax paper, over the photo of the masks, to the cookie sheet.
- Using a small pastry bag filled with the red royal icing and a #2 tip, start outlining the mask.
- Fill in the outline of the mask following the printed example with the red icing. Allow this to dry for 30 seconds to prevent the colors from bleeding.
- Using a small pastry bag filled with the white royal icing and a #2 tip, fill in the eyes on the mask with the white icing. Allow this to dry for 30 seconds.
- Using a small pastry bag filled with the golden yellow royal icing and a #2 tip, start by outlining the inner part of the mask. Fill in the outline of the inner mask with the golden yellow icing. Allow this to dry for several minutes.
- Following the picture use the Wilton Foodwriter to make the black marks on the mask, and allow to dry for 5-10 hours.
- To ensure the mask is dry, gently touch one of them with your finger. If it allows you to push in on the icing, give it a little more time to dry. If the mask is dry, it will feel hard to the touch.
- Cut the wax paper holding the completed masks into squares surrounding the completed design.
- Once the masks are dry, carefully peel the wax paper off of the back of the images and place on the frosted cupcake.