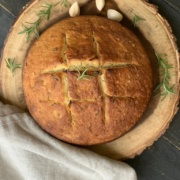
Rosemary Garlic Bread Recipe
Delicious made from scratch bread filled with the scrumptious flavors of fresh rosemary and roasted garlic.
Servings: 12 servings
Calories: 186kcal
Ingredients
- 4 cups bread all-purpose flour plus extra for kneading
- 1 tsp yeast
- 1 1/2 tsp kosher salt plus more for topping
- 1 1/2 C water
- 3 T olive oil
- 1/4 C fresh rosemary chopped
- 4 bulbs garlic roasted
Instructions
- Combine the flour, yeast, and salt in a large mixing bowl.
- Add water to the mix and stir until combined.
- Gradually add the rest of the flour and continue to stir until all the flour is absorbed into the dough. At this point, I get my hands into the dough to make sure it's mixed well. This usually takes 5 to 10 minutes. If the dough is sticking to your hands, just wet them a little.
- Add chopped rosemary and roasted garlic to the dough. We used a lot of garlic! Remove garlic cloves from the bulbs before adding. Remember it will soften and shrink down a lot.
- As you mix the garlic in, it will dissolve, spreading that garlicky goodness throughout the bread. If you would prefer to have chunks of garlic in the bread, wait until just before the bread goes in the oven and poke the garlic into the bread.
- Put the dough back in the bowl and cover with plastic wrap.
- Let dough rise in a warm place for 2 hours. It can rise longer, so if you have things to do, it's okay to leave the dough for up to about 4 hours.
- Pull the dough out of the bowl and knead. The kneading creates the elasticity in the dough thanks to the yeast that captures the gases.
- You should knead for at least 10 minutes, but it may take longer to pass the windowpane test. Take off a good piece of the dough and slowly stretch it. If it pulls apart, add that piece back in and get back to the business of kneading for another 2-3 minutes. Keep repeating this process until the bread stretches to the point that if you hold it up to a light you can see the light shining through it. See the light? Great! Let's move on.
- Roll dough into a tight ball.
- Pour about a tablespoon of oil into your dutch oven and coat bottom and sides.
- Place dough in the center of the pan and cover with the lid.
- Let the dough rise again for about 45 minutes.
- Preheat oven to 450º.
- Pour about a tablespoon of olive oil over the bread and smooth it over the entire exposed surface.
- Score the bread.
- Sprinkle with kosher salt to your liking. (We used about 1/2 tablespoon)
- Replace the lid and place the dutch oven in the oven.
- Bake for 30 minutes with the lid on.
- After 30 minutes, remove the lid and bake for another 12-15 minutes to get a good brown crust on the bread.
- Once you take the bread out, give it a quick knock to make sure the sound is hollow.
- Let the bread rest for about 30 minutes.
Nutrition
Serving: 1slice | Calories: 186kcal | Carbohydrates: 32g | Protein: 4g | Fat: 4g | Saturated Fat: 1g | Polyunsaturated Fat: 1g | Monounsaturated Fat: 3g | Sodium: 294mg | Potassium: 55mg | Fiber: 1g | Sugar: 0.1g | Vitamin A: 17IU | Vitamin C: 0.4mg | Calcium: 11mg | Iron: 2mg